Introduction
Welcome to the world of Firebase and FlutterFlow! Firebase is a well-known development platform created by Google. It provides a wide range of tools that can enhance the capabilities of mobile and web applications. When combined with FlutterFlow, a leading app development framework, Firebase unlocks new potentials in app development, making processes more streamlined and efficient. This comprehensive guide has been designed to walk you through the nuances of integrating Firebase with FlutterFlow, focusing on setting up a robust database for your application.
Exploring Firebase in FlutterFlow
Firebase is a powerful tool with excellent integration capabilities. In FlutterFlow, it acts as a foundation, offering real-time updates, secure data storage, and authentication services. This guide will explore these features in detail, showing you how to use them to improve your FlutterFlow apps.
Setting Up a New Project in Firebase
Initial Steps for Firebase Project Setup
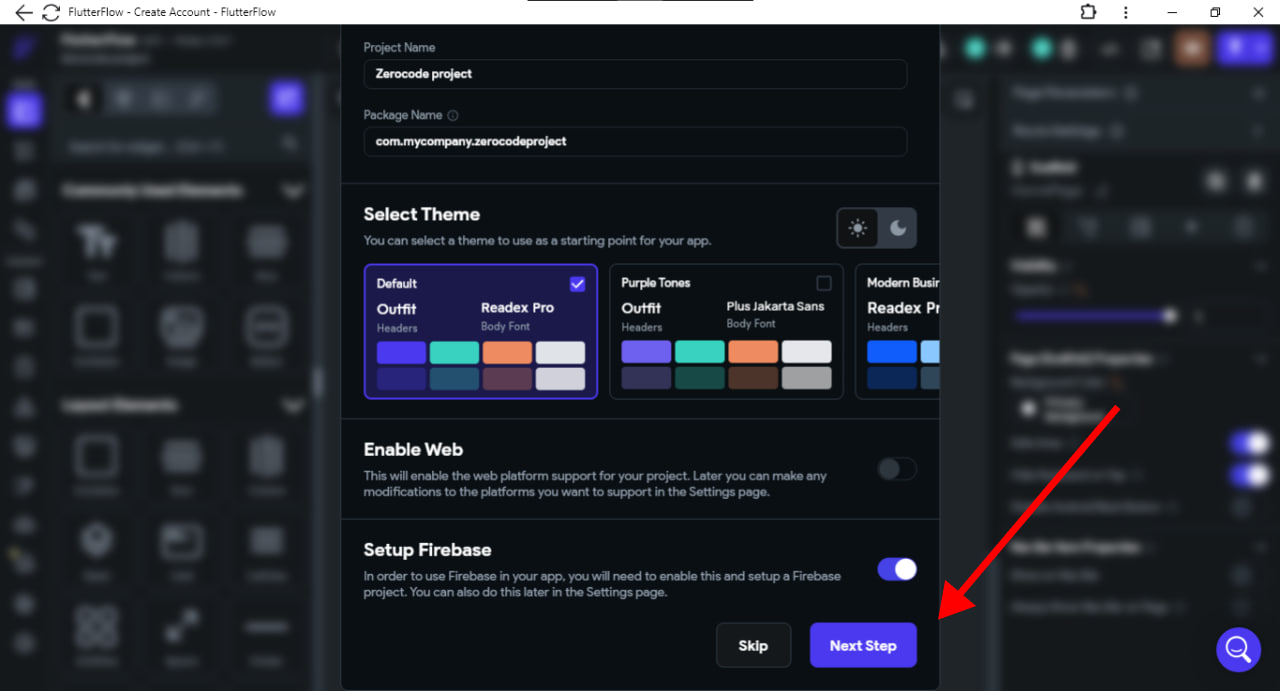
When creating a new project, enable the Setup Firebase option and click Next Step.


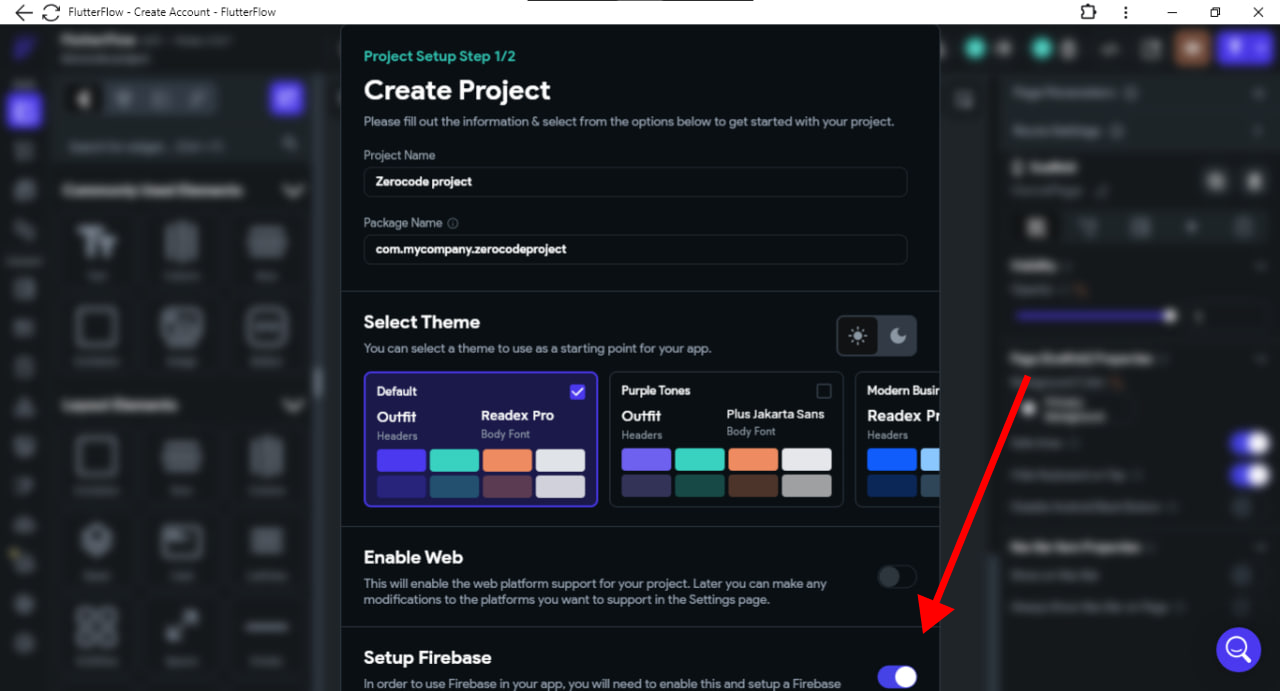
To create a project, click on the '+ Create Project' button. This will open a popup where you can confirm the Project Name and select the Firebase Project Region. We recommend choosing the region based on your users' location. Once you have verified these details, click on 'Create' or 'Sign in with Google' to start creating the project on Firebase. Please note that the project region cannot be changed after the project is created.
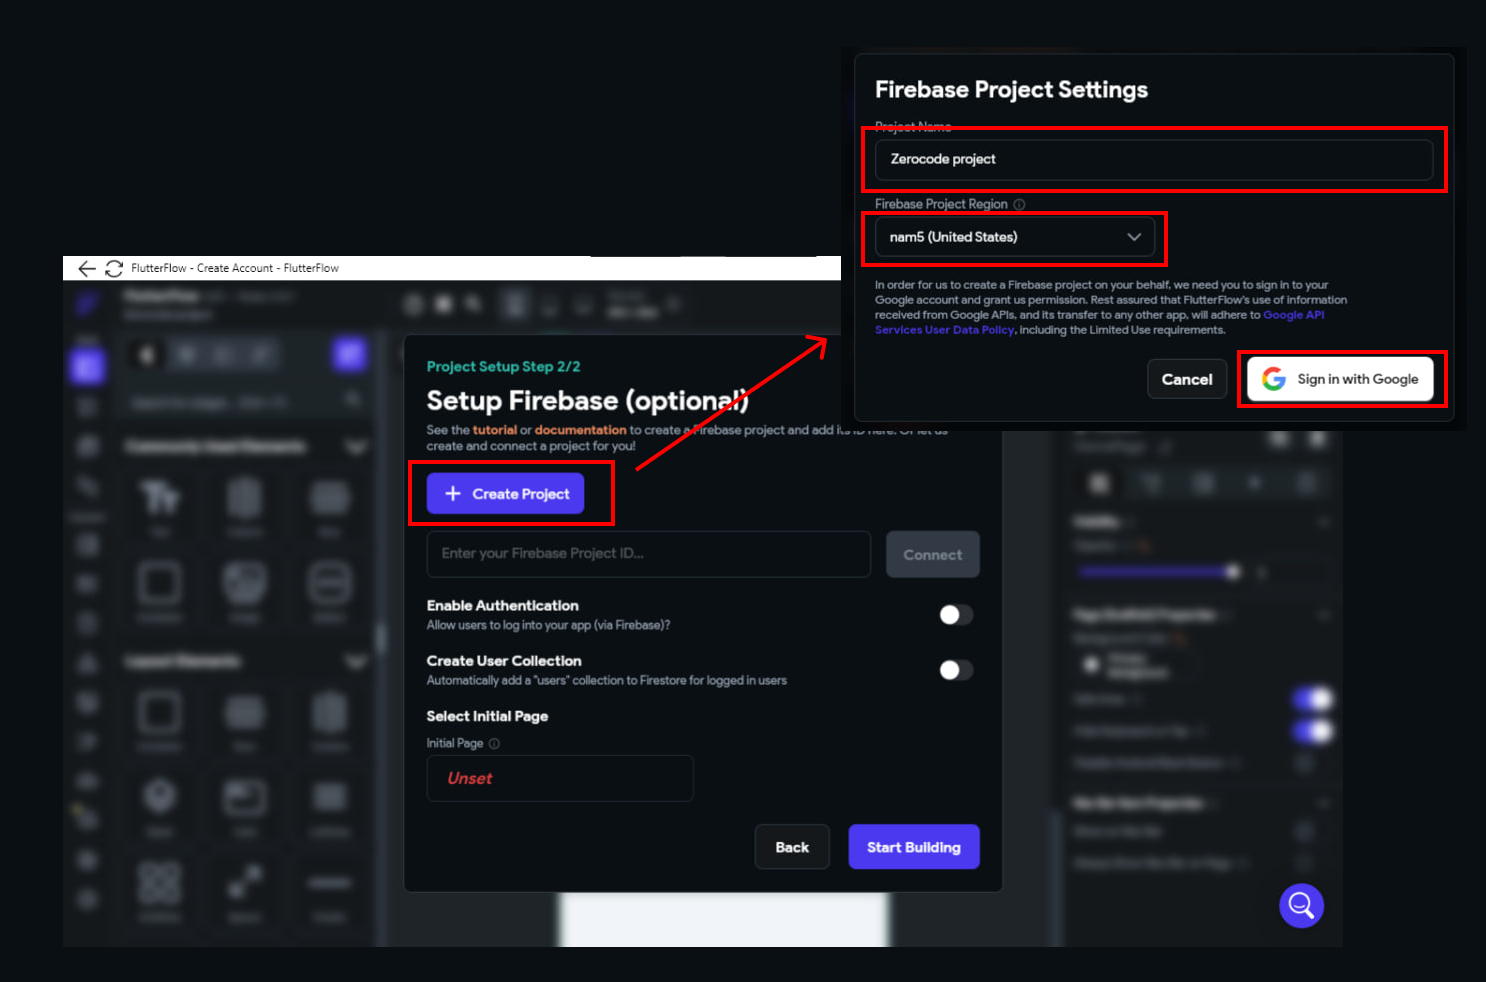
If asked, you must grant access to 'flutterflow.io' to create and configure the Firebase project for you. You can select all and click continue.

Enabling and configuring Firebase Authentication and Firebase Content Manager.
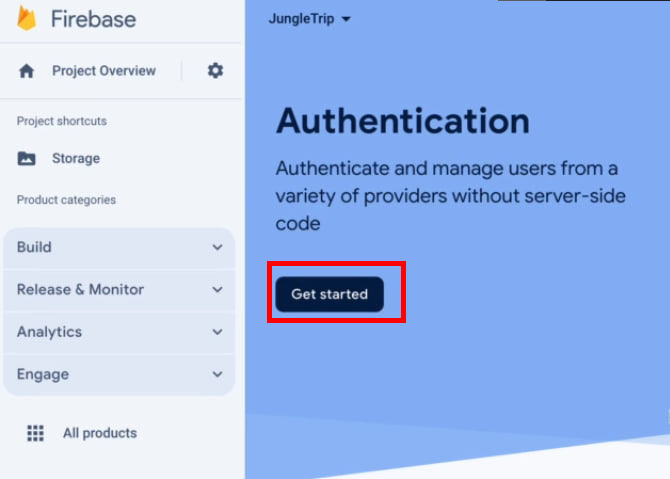
To use Firebase Authentication in your app or Firebase Content Manager, enable it in the Firebase console and activate the 'Email/Password' sign-in.

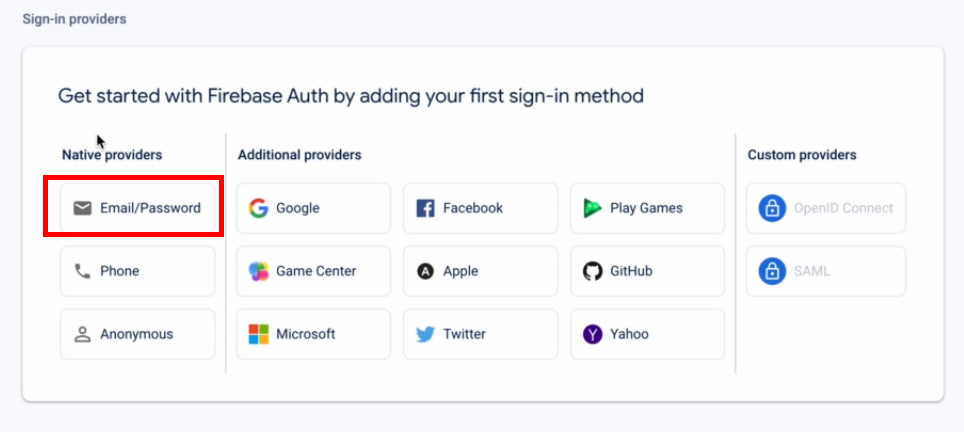


Configuring Firebase Storage and generating configuration files.
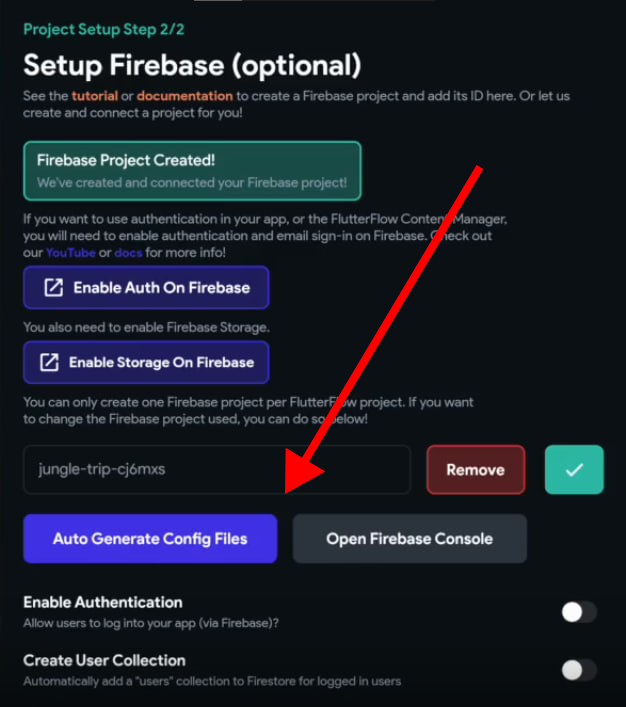
To enable storage on Firebase, please click on the option 'Enable Storage on Firebase' and activate it on the Firebase console.


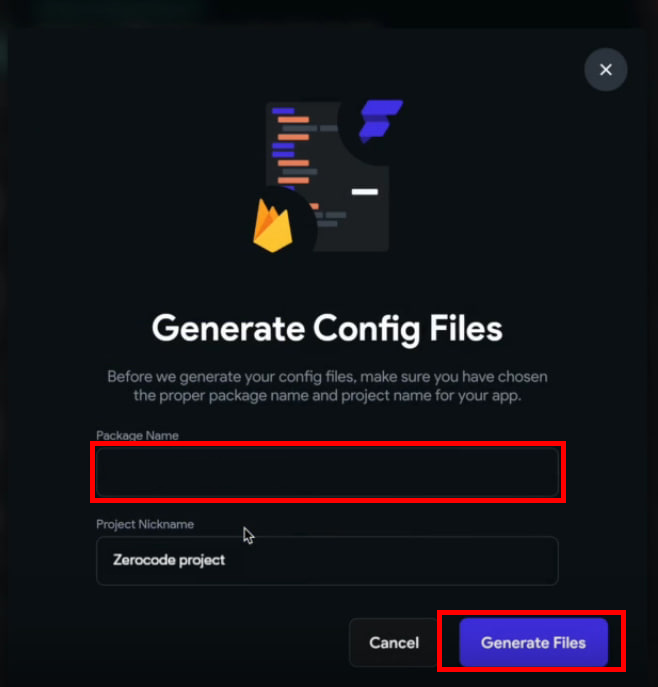
The configuration files are necessary to connect to Firebase. They contain various settings and keys that enable your project to communicate with Firebase services. To generate these files, click on Auto Generate Config Files and then click Generate Files.
Please notice that the 'Package Name' field is filled in.
Connecting a new Firebase project to an existing FlutterFlow project.
To add a new Firebase project to an existing FlutterFlow project, go to Settings & Integrations > Project Setup > Firebase, then follow the instructions under "Firebase Project Setup."
Integration of the existing Firebase project with the FlutterFlow project.
If you have an existing Firebase project and wish to link it with your FlutterFlow project, follow these steps:
1. Go to the Settings & Integrations section in your FlutterFlow project.
2. Click on Project Setup and then select Firebase.
3. Enable the Setup Firebase option and click on the Firebase Setup Wizard.
4. Click on Next Step and carefully follow the instructions to complete the process.
Enable access to your project.."
To add [email protected] as an "Editor" for your project, follow these steps in the Firebase dashboard:
1. Navigate to the left-hand menu and select Project Settings --> Users and Permissions.
2. Click on "Add Member" in the top right corner.
3. Enter [email protected] and select the "Editor" role, then click "Done" and "Add Member.".
4. On the same page, click on "Advanced Permission Settings" (small blue text below the table). This will open the Google Cloud console in a new browser window.
5. Find the row containing [email protected] and select "Edit principal" (pencil on the far right).
6. Click on "+ Add Another Role".
7. Under "Select A Role," search for "Service Account User" (you may need to scroll to find this). Select "Service Account User".
8. Click on "+ Add Another Role" again. Under "Select A Role,"," search for "Cloud Functions Admin."," Select "Cloud Functions Admin".
9. Select "Save".
Configuring the Firestore Database
To set up the Firestore Database, you can create collections and add documents directly from FlutterFlow. This makes it easier for you to manage and integrate your data into your app.
Configuration of the Firestore Database for creating collections and documents.
Go to your Firebase project's dashboard, click on the left menu, select Firestore Database under Build, and then click Create Database (highlighted in red in the screenshot).
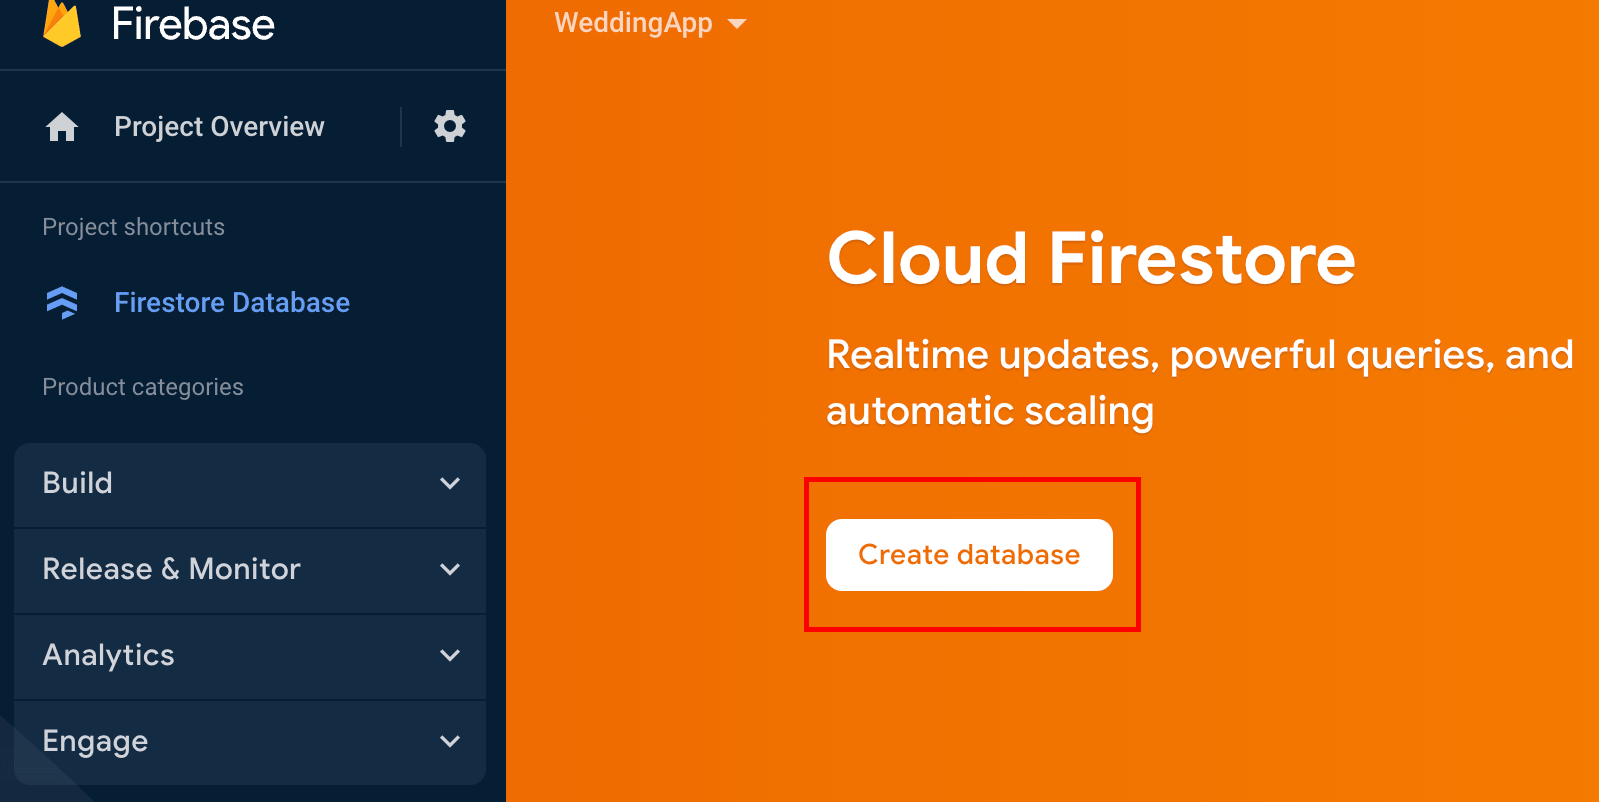
To set up Firebase Security Rules quickly, you can start in test mode and proceed by selecting Next.

When setting up Firestore, select a location from the dropdown and enable it. For more information on Firebase locations, refer to this link.

Once you complete the process, you will land on the panel view of Cloud Firestore. These are the steps where you can start creating collections and documents immediately!
Enabling Billing (Optional)
These are the steps to enable billing for the Firebase project.
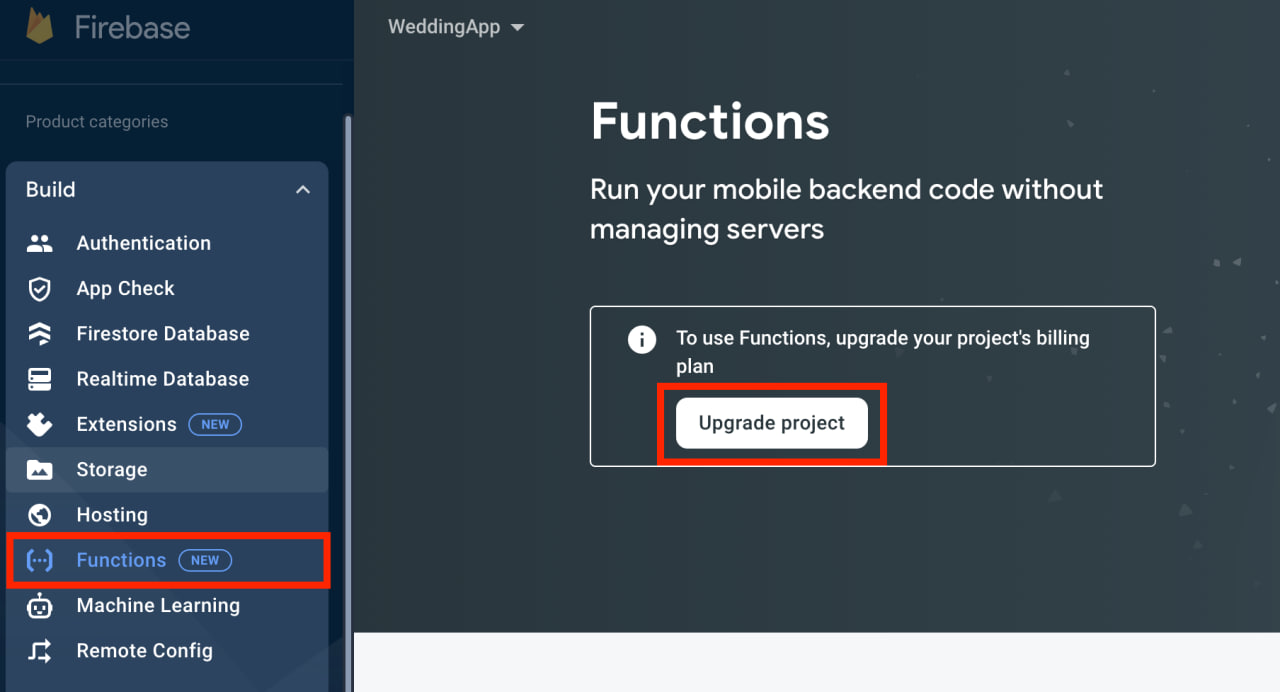
Go to your Firebase project's dashboard, select Build, then Functions, and click Upgrade project.
To make a purchase, select the appropriate option. If it's your first time enabling billing, you will be redirected to a new page where you can provide your payment information. If not, you can set a project budget. For more information on Firebase pricing, please refer to this link.

An overview of features that require enabling billing, such as Braintree payments and Push Notifications.
Enabling billing in Firebase provides access to advanced features beyond the free tier. Features such as Braintree payments and Push Notifications typically require a paid plan. Braintree payments facilitate financial transactions within the app, while Push Notifications enable sending messages directly to users' devices. These features significantly enhance user engagement and app monetization, but their resource-intensive nature necessitates upgraded Firebase plans. You can refer to the Firebase documentation for a detailed understanding of which features require billing.
Completing the Setup
Select the start pages and complete the project setup.
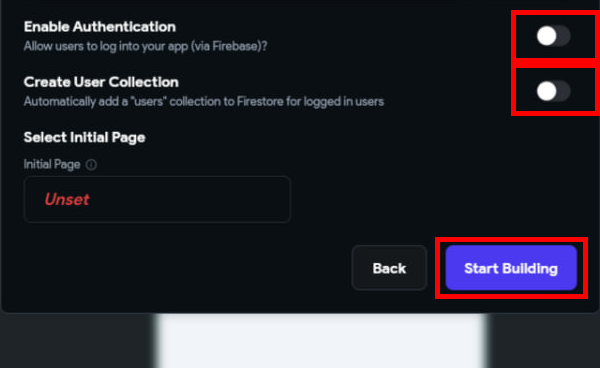
The "Select Initial Pages" feature allows you to choose the first page that a user sees when they open the app (Entry Page) and the first page they see after logging in (Logged In Page). If you click on "Unset," you will be presented with a list of templates.

Enabling authentication and creating a collection of users.
To allow users to log into your app using different sign-in methods, including email and password, social media providers, and phone numbers, you need to turn on the Enable AuthenticationYou need to turn on the Enable Authentication feature to allow users to log into your app using different sign-in methods, including email and password, social media providers, and phone numbers. Do note that this step solely enables authentication.
If you want to automatically add a user to the collection to Firestore Database, which will be used to store the details of logged-in users, such as email and password, you need to turn on the Create User Collection feature.
Once you have done the above, you can click on the Start Building button.
After creating the project, it's a good idea to add authentication as soon as possible. To avoid permission issues, deploy the Firestore rules by selecting Firebase from the Navigation menu, followed by Firestore Settings, then Firestore Rules, and finally, clicking Deploy.
Understanding the Impact of Firebase on Your Application
Firebase is a powerful platform for developing applications, offering real-time synchronization, robust authentication, and scalable storage solutions.
Success Stories in FlutterFlow
FlutterFlow has been instrumental in the success of various applications across different industries. Here are some notable success stories:

Ab.Money: Developed by AppFul.Pro, a Czech Republic-based agency, Ab.Money is a lifestyle meditation app that has achieved significant success. Within two months of switching to FlutterFlow, the app reached the top position in the education category on the App Store in Eastern Europe. It garnered a 4.8 rating on the App Store, a perfect 5.0 on Google Play, over $100,000 in revenue, and amassed 250,000 users. The app features meditations, an affirmations feature, and a custom audio player, among other functionalities. Its development involved a combination of FlutterFlow's native features and custom code for unique functionalities.

Kawenter: Developed by Mustafa Alwan, Kawenter is a travel application that helps users with eVisa or eTA applications. It allows users to check the status of their applications, submit supporting documents, and even download visas. Additionally, it offers features like checking travel requirements and booking flights and hotels.
The examples provided above illustrate the wide range of applications that can be built using FlutterFlow. From health and fitness to finance and travel, FlutterFlow has the potential to develop a variety of applications, both niche and general-purpose. These examples demonstrate how easy it is to use FlutterFlow and its versatility in app development.
Additional Resources and Comprehensive Guides
For an in-depth understanding and step-by-step instructions, refer to the FlutterFlow Firebase Setup Documentation available at FlutterFlow Documentation.
This comprehensive guide provides a detailed overview of how to integrate Firebase into your FlutterFlow projects. Whether you're starting a new project or integrating Firebase into an existing one, this guide covers all aspects, from project setup to Firestore configuration and finalizing the setup. Firebase's range of features makes it an essential asset for modern app developers, elevating the capabilities of FlutterFlow applications to new levels.
Check also our Full Guide On Dropshipping: From Idea To Realization


